Azure charges for OS Disk space, so even if a VM is not running, it costs money to exist. The default Windows 2019 image creates a 128GB disk, and even the Ubuntu images is based on a 30GB disk, and will cost $2.40 or $5.28 monthly depending on Premium_LRS or StandardSSD_LRS. The default in Azure Portal & for ARM templates is to assign Premium SSDs, so mostly my servers have been ~$5/mo just for disk.
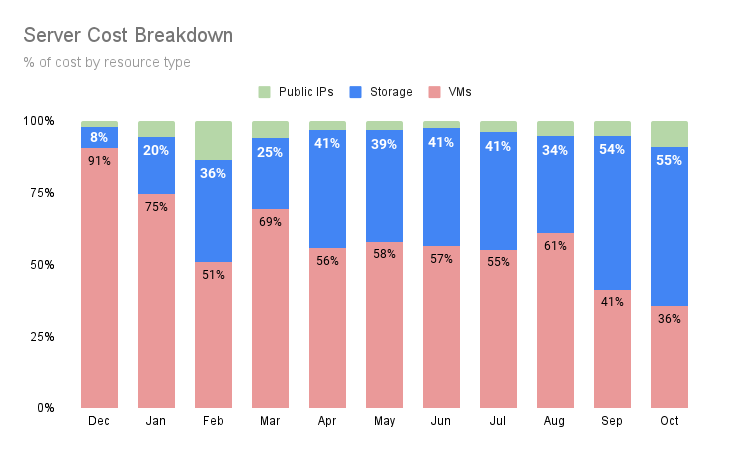
Recently, I have started running a larger number of VMs with lower compute cost and many of them deallocated most of the time. This has resulted in storage actually becoming the largest component of my bill.
By reducing the Ubuntu base image to 16GB, we can move from a 32GB Premium SSD to a 16GB Standard SSD, saving $4.08 per month. It doesn’t seem like a lot, with 5+ VMs it will add up to hundreds of dollars over a year or more.
Managed Disk Cost / month (as of Nov 2021)
| Tier | 8GB | 16GB | 32GB | 128GB |
|---|---|---|---|---|
| Premium_LRS (SSD) | $1.48 | $2.96 | $5.28 | $19.71 |
| StandardSSD_LRS (SSD) | $0.60 | $1.20 | $2.40 | $9.60 |
| Standard_LRS (HDD) | n/a | n/a | $1.54 | $5.89 |
VirtualBox & azure won’t allow us to shrink VHD files, so this is my workaround.
Downsides: - This is way more work to save like $1.50/month/VM, vs just switching to StandardSSD_LRS - Image must be manually replicated using Image Gallery, the replica storage might eat up any cost savings unless its deployed a lot.
Down-sizing the Ubuntu VHD File
Requires: VirtualBox, Ubuntu Live CD
TODO: figure out how to do this natively in windows, maybe Hyper-V can do it (requires Windows Pro).
Download & extract a Ubuntu Azure image
Open VirtualBox, create a VM using an ubuntu live cd
Create an empty 16GB VHD file
- In VirtualBox, File -> Virtual Media Manager
- Create, VHD, Fixed Size, 16GB, ubuntu-16gb.vhd
In Virtual Media Manager, add the ubuntu-azure image. Set Properties -> Type -> Immutable
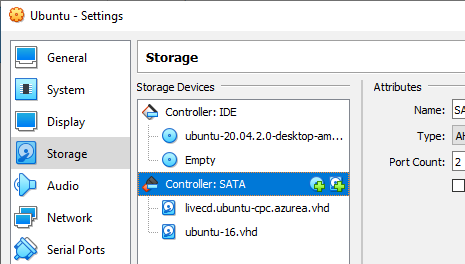
On the VM, Settings -> Storage
Add a SATA controller for the 30GB ubuntu-azure image
Add a SATA controller for the 16GB new image
Start the VM, boot into the live CD
$ sudo fdisk -l(or use gparted)- /dev/sdX: path of the 30GB ubuntu-azure image
- /dev/sdY: path of the empty ubuntu-16gb image

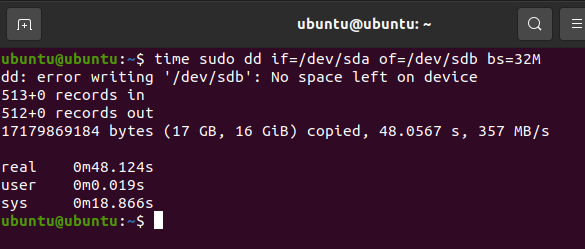
- Copy the contents of the ubuntu-azure image to the empty VHD
sudo dd if=/dev/sdX of=/dev/sdY bs=32Mit will end with error “No space left on device”, which is fine
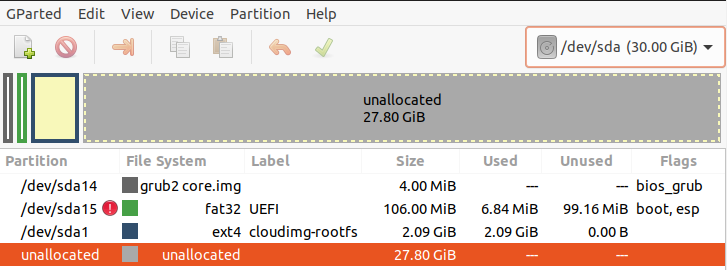
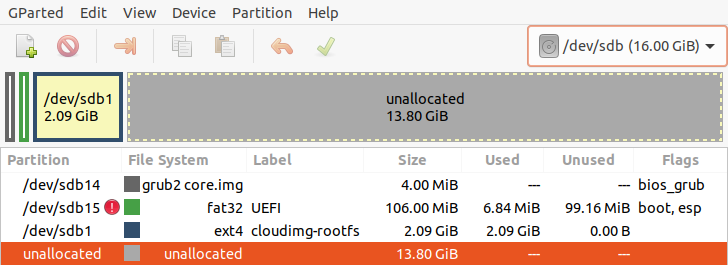
The new 16GB ubuntu image looks like this in gparted:
Create an Image in Azure
Requires: azure-cli, AzCopy
# Get the exact size in bytes of the VHD
$ wc -c ubuntu-16.vhd

# Create an empty disk in azure
$ az disk create -n $DISK_NAME -g $RESOURCE_GROUP -l centralus --os-type Linux --for-upload --upload-size-bytes $SIZE_BYTES --sku standard_lrs

# Get access/link to upload VHD blob. It will output the `accessSas` in the JSON output
$ az disk grant-access -n $DISK_NAME -g $RESOURCE_GROUP --access-level Write --duration-in-seconds 86400

# Use AzCopy to upload the VHD
$ azcopy.exe copy ubuntu-16gb.vhd "$BLOB_URL" --blob-type PageBlob

# revoke write access to the disk
$ az disk revoke-access -n $DISK_NAME -g $RESOURCE_GROUP

# Create an image with the disk
$ az image create -n $IMAGE_NAME -g $RESOURCE_GROUP --source $DISK_NAME --os-type Linux
This image can now be used in an Image Gallery and replicated to other regions.
Using the Image
Use the image directly in an ARM template
# Get the image id
$ az image show -g $RESOURCE_GROUP --name $IMAGE_NAME | jq -r ".id"
In the ARM JSON, set the imageReference to
"imageReference": {
  "id": "$IMAGE_ID"
}
Add to image gallery for replication
Through Azure Portal, create an “Azure compute gallery”.
Then Add-> VM Image Definition - Region: (any region) - OS type: Linux - OS state: Generalized - VM Generation: Gen 1 - Under ‘Version’, select the image as the source image
Get the resource id from VM image definition -> Properties -> Resource ID
You can also get it from azure-cli:
$ az sig image-definition show -g $RESOURCE_GROUP --gallery-name $GALLERY_NAME --gallery-image-definition $IMAGE_DEFINITION_NAME | jq -r ".id"Set the imageReference to
"imageReference": {
  "id": "$RESOURCE_ID"
}